第二节:应用的结构
你将学到
- 一个典型的 React + Redux 应用程序的结构
- 如何在 Redux DevTools Extension 中查看 state 变化
简介
在 第一节:Redux 概述和概念 中 ,我们研究了 Redux 为何有用 ,和用于描述 Redux 代码不同部分的术语和概念,以及数据如何在 Redux 应用程序中流动。
现在,让我们看一个真实的工作示例,看看这些部分是如何组合在一起的。
计数器示例应用程序
我们将看到的示例项目是一个小型计数器应用程序,它允许我们在单击按钮时对数字进行加减运算。它可能不是很令人兴奋,但它展示了一个 React + Redux 应用程序的所有重要部分。
本项目使用 Create-React-App 的官方 Redux 模板 创建。开箱即用,它已经配置了标准的 Redux 应用程序结构,使用 Redux Toolkit 创建 Redux store 和逻辑,以及 React-Redux 将 Redux store 和 React 组件连接在一起。
这是该项目的实时版本。 你可以通过单击右侧应用程序预览中的按钮来试用它,并浏览左侧的源文件。
如果你想尝试在自己的电脑上创建这个项目,你可以[开始一个新的 Create-React-App 项目](https://create-react-app.dev/docs/getting-started#selecting-a -template) 使用我们的 Redux 模板:
npx create-react-app redux-essentials-example --template redux
使用计数器应用程序
计数器应用程序已经设置好,让我们可以在使用时观察内部发生的情况。
打开浏览器的 DevTools。 然后,在 DevTools 中选择 “Redux” 选项卡,然后单击右上角工具栏中的“State”按钮。 你应该会看到如下所示的内容:
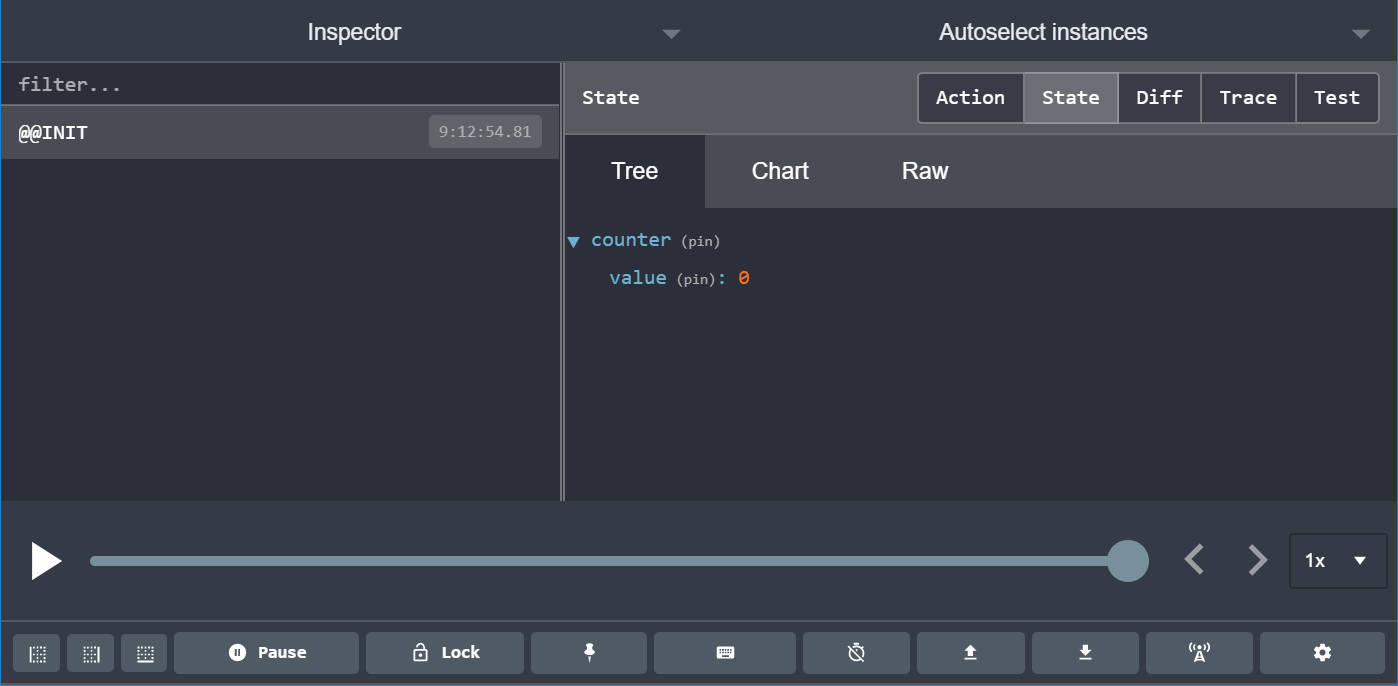
在右侧,我们可以看到我们的 Redux Store 的初始 state 是这样:
{
  counter: {
    value: 0
  }
}
DevTools 将向我们展示 Store 中的 state 是如何变化的。
让我们先玩一下这个应用程序,看看它有什么作用。单击应用程序中的“+”按钮,然后查看 Redux DevTools 中的 “Diff” 选项卡:
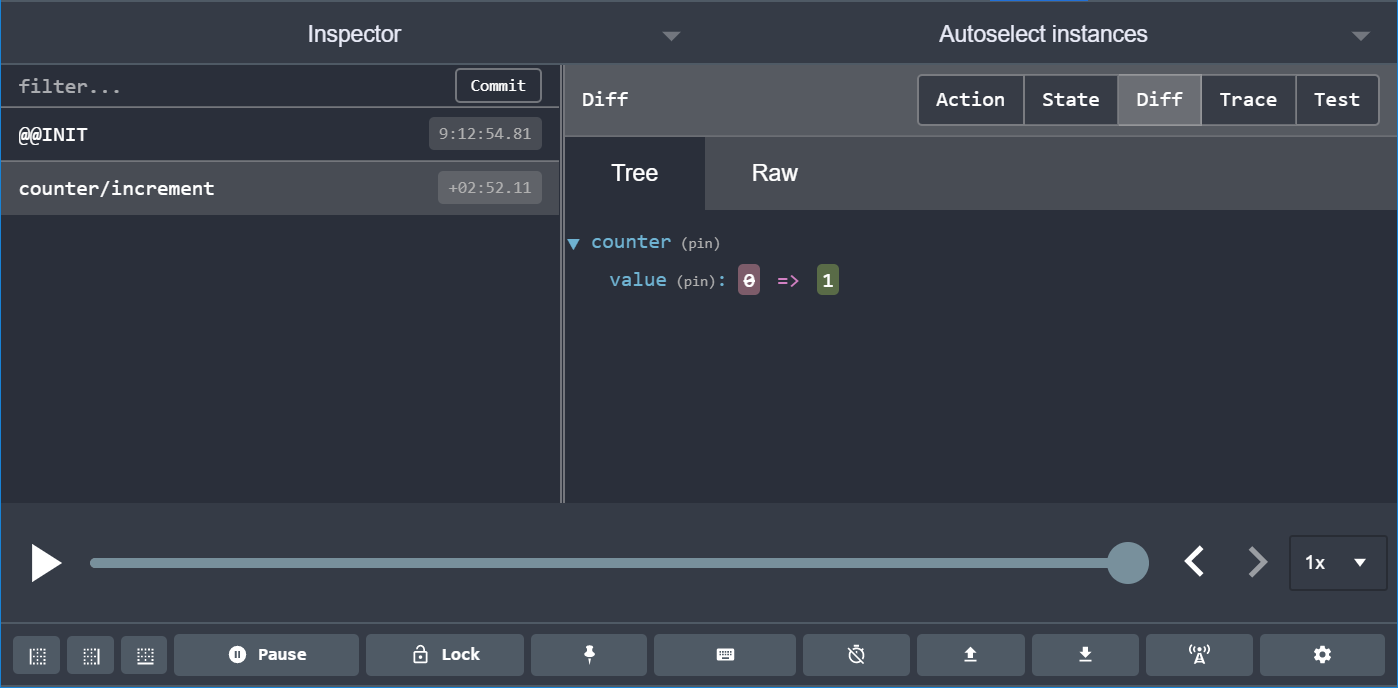
我们可以在这里看到两个重要的事情:
- 当我们点击“+”按钮时,一个 type 为“counter/increment”的 action 被 dispatch 到 store
- dispatch action 后,
state.counter.value字段开始从0改到1
现在尝试以下步骤:
- 再次单击“+”按钮。显示的值现在应该是 2。
- 单击“-”按钮一次。显示的值现在应该是 1。
- 单击“添加金额”按钮。显示的值现在应该是 3。
- 将文本框中的数字“2”更改为“3”
- 单击“添加异步”按钮。你应该会看到一个进度条填充按钮,几秒钟后,显示的值应更改为 6。
回到 Redux DevTools。你应该会看到总共 dispatch 了五个 action,每单击一个按钮触发一次。现在从左侧列表中选择最后一个 "counter/incrementByAmount" 条目,然后单击右侧的 "Action" 选项卡:
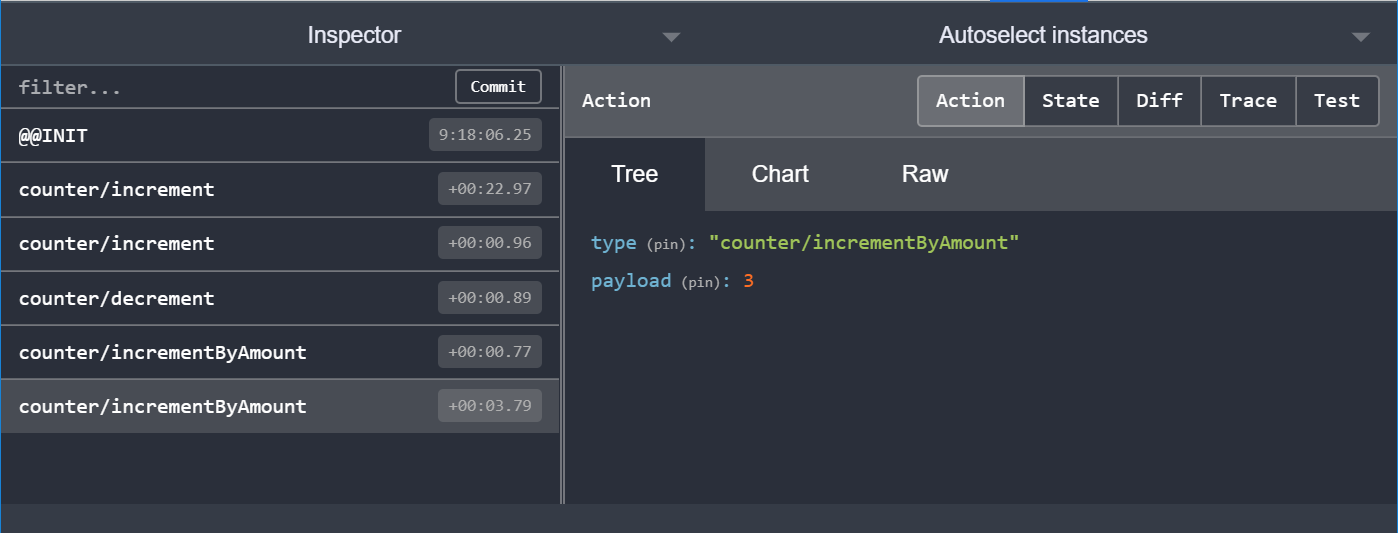
我们可以看到这个 action 对象是这样的:
{
  type: 'counter/incrementByAmount',
  payload: 3
}
如果你单击 “Diff” 选项卡,你可以看到 state.counter.value 字段响应该 action 从 3 更改为 6。
查看我们的应用程序内部发生的事情以及我们的状态如何随时间变化的能力非常强大!
DevTools 有更多命令和选项可帮助你调试应用程序。尝试单击右上角的 “Trace” 选项卡。 你应该在面板中看到一个 JavaScript 函数堆栈跟踪,其中有几段源代码显示了当 action 到达 store 时正在执行的行。特别应该突出显示一行:我们从 <Counter> 组件 dispatch 此 action 的代码行:
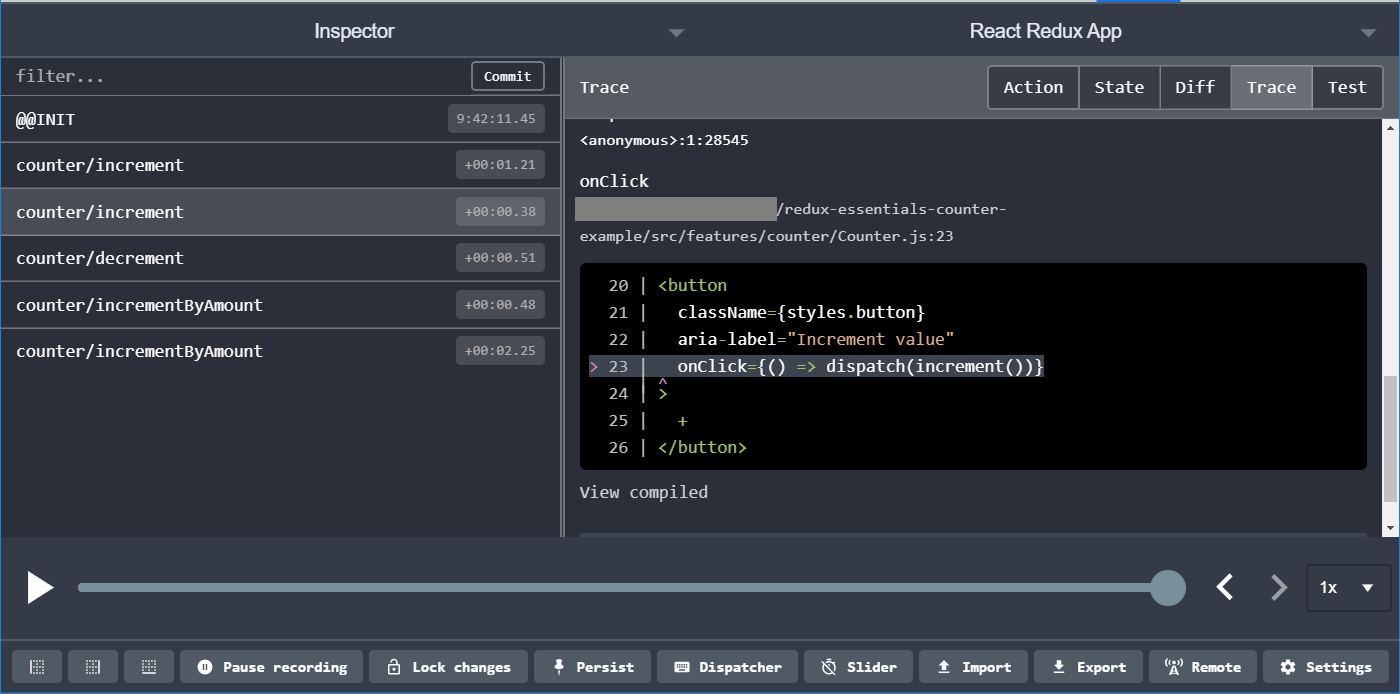
这使得跟踪代码的哪一部分 dispatch 了特定 action 变得更加容易。
应用目录
你已经知道了应用的功能,现在看一下代码实现。
以下是构成此应用程序的关键文件:
/srcindex.js: app 入口App.js: 顶级 React 组件/appstore.js: 创建 Redux store 实例
/features/counterCounter.js: 展示 counter 特性的 React 组件counterSlice.js: counter 特性相关的 redux 逻辑
让我们先看看 Redux store 是如何创建的。
创建 Redux Store
打开 app/store.js,代码是这样:
import { configureStore } from '@reduxjs/toolkit'
import counterReducer from '../features/counter/counterSlice'

export default configureStore({
  reducer: {
    counter: counterReducer
  }
})
Redux store 是使用 Redux Toolkit 中的 configureStore 函数创建的。configureStore 要求我们传入一个 reducer 参数。
我们的应用程序可能由许多不同的特性组成,每个特性都可能有自己的 reducer 函数。当我们调用configureStore 时,我们可以传入一个对象中的所有不同的 reducer。 对象中的键名 key 将定义最终状态树中的键名 key。
我们有一个名为 features/counter/counterSlice.js 的文件,它为计数器逻辑导出了一个 reducer 函数。 我们可以在此处导入 counterReducer 函数,并在创建 store 时包含它。
当我们传入一个像 {counter: counterReducer} 这样的对象时,它表示我们希望在 Redux 状态对象中有一个 state.counter 部分,并且我们希望每当 dispatch action 时 counterReducer 函数负责决定是否以及如何更新 state.counter 部分。
Redux 允许使用不同类型的插件(“middleware”和“enhancers”)自定义 store 设置。configureStore 默认会自动在 store setup 中添加几个中间件以提供良好的开发者体验,并且还设置 store 以便 Redux DevTools Extension 可以检查其内容。
Redux Slice
“slice” 是应用中单个功能的 Redux reducer 逻辑和 action 的集合, 通常一起定义在一个文件中。该名称来自于将根 Redux 状态对象拆分为多个状态 “slice”。
比如,在一个博客应用中,store 的配置大致长这样:
import { configureStore } from '@reduxjs/toolkit'
import usersReducer from '../features/users/usersSlice'
import postsReducer from '../features/posts/postsSlice'
import commentsReducer from '../features/comments/commentsSlice'

export default configureStore({
  reducer: {
    users: usersReducer,
    posts: postsReducer,
    comments: commentsReducer
  }
})
例子中,state.users,state.posts,和 state.comments 均是 Redux state 的一个 独立的 “slice”。由于 usersReducer 负责更新 state.users slice,我们将其称为 “slice reducer” 函数。
细节说明:Reducer 与 State 的结构
Redux store 需要在创建时传入一个 “root reducer” 函数。因此,如果我们有许多不同的 slice reducer 函数,我们如何获得单个 root reducer,以及它如何定义 Redux store 中 state 的内容呢?
如果我们尝试手动调用所有 slice 的 reducer,它可能如下所示:
function rootReducer(state = {}, action) {
  return {
    users: usersReducer(state.users, action),
    posts: postsReducer(state.posts, action),
    comments: commentsReducer(state.comments, action)
  }
}
这会单独调用每个 slice reducer,传入 Redux state 的特定 slice,并将每个返回值包含在最终的新 Redux state 对象中。
Redux 有一个名为 combineReducers 的函数,它会自动为我们执行此操作。它接受一个全是 slice reducer 的对象作为其参数,并返回一个函数,该函数在调度操作时调用每个 slice reducer。每个 slice reducer 的结果都组合成一个对象作为最终结果。我们可以使用 combineReducers 做和前面例子一样的事情:
const rootReducer = combineReducers({
  users: usersReducer,
  posts: postsReducer,
  comments: commentsReducer
})
当我们将 slice reducer 的对象传递给 configureStore 时,它会将这些对象传递给 combineReducers 以便我们生成根 reducer。
正如我们之前看到的,你也可以直接传递一个 reducer 函数作为 reducer 参数:
const store = configureStore({
  reducer: rootReducer
})
创建 Slice Reducer 和 Action
既然我们知道counterReducer 函数来自 features/counter/counterSlice.js,那么让我们一块一块地看看那个文件里有什么。
import { createSlice } from '@reduxjs/toolkit'

export const counterSlice = createSlice({
  name: 'counter',
  initialState: {
    value: 0
  },
  reducers: {
    increment: state => {
      // Redux Toolkit 允许我们在 reducers 写 "可变" 逻辑。
      // 并不是真正的改变 state 因为它使用了 immer 库
      // 当 immer 检测到 "draft state" 改变时,会基于这些改变去创建一个新的
      // 不可变的 state
      state.value += 1
    },
    decrement: state => {
      state.value -= 1
    },
    incrementByAmount: (state, action) => {
      state.value += action.payload
    }
  }
})

export const { increment, decrement, incrementByAmount } = counterSlice.actions

export default counterSlice.reducer
早些时候,我们看到单击视图中的不同按钮会 dispatch 三种不同类型的 Redux action:
{type: "counter/increment"}{type: "counter/decrement"}{type: "counter/incrementByAmount"}
我们知道 action 是带有 type 字段的普通对象,type 字段总是一个字符串,并且我们通常有 action creator 函数来创建和返回 action 对象。那么在哪里定义 action 对象、类型字符串和 action creator 呢?
我们可以每次都手写。但是,那会很乏味。此外,Redux 中真正重要的是 reducer 函数,以及其中计算新状态的逻辑。
Redux Toolkit 有一个名为 createSlice 的函数,它负责生成 action 类型字符串、action creator 函数和 action 对象的工作。你所要做的就是为这个 slice 定义一个名称,编写一个包含 reducer 函数的对象,它会自动生成相应的 action 代码。name 选项的字符串用作每个 action 类型的第一部分,每个 reducer 函数的键名用作第二部分。因此,"counter" 名称 + "increment" reducer 函数生成了一个 action 类型 {type: "counter/increment"}。(毕竟,如果计算机可以为我们做,为什么要手写!)
除了 name 字段,createSlice 还需要我们为 reducer 传入初始状态值,以便在第一次调用时就有一个 state。在这种情况下,我们提供了一个对象,它有一个从 0 开始的 value 字段。
我们可以看到这里有三个 reducer 函数,它们对应于通过单击不同按钮 dispatch 的三种不同的 action 类型。
createSlice 会自动生成与我们编写的 reducer 函数同名的 action creator。我们可以通过调用其中一个来检查它并查看它返回的内容:
console.log(counterSlice.actions.increment())
// {type: "counter/increment"}
它还生成知道如何响应所有这些 action 类型的 slice reducer 函数:
const newState = counterSlice.reducer(
  { value: 10 },
  counterSlice.actions.increment()
)
console.log(newState)
// {value: 11}
Reducer 的规则
上一节讲过,Reducer 必需符合以下规则:
- 仅使用
state和action参数计算新的状态值 - 禁止直接修改
state。必须通过复制现有的state并对复制的值进行更改的方式来做 不可变更新(immutable updates)。 - 禁止任何异步逻辑、依赖随机值或导致其他“副作用”的代码
但为什么这些规则很重要?有几个不同的原因:
- Redux 的目标之一是使你的代码可预测。当函数的输出仅根据输入参数计算时,更容易理解该代码的工作原理并对其进行测试。
- 另一方面,如果一个函数依赖于自身之外的变量,或者行为随机,你永远不知道运行它时会发生什么。
- 如果一个函数 mutate 了其他对象,比如它的参数,这可能会意外地改变应用程序的工作方式。这可能是错误的常见来源,例如“我更新了我的状态,但现在我的视图没有在应该更新的时候更新!”
- Redux DevTools 的一些功能取决于你的 reducer 是否正确遵循这些规则
“不可变更新(Immutable Updates)” 这个规则尤其重要,值得进一步讨论。
Reducer 与 Immutable 更新
前面讲过 “mutation”(更新已有对象/数组的值)与 “immutability”(认为值是不可以改变的)
在 Redux 中,永远 不允许在 reducer 中更改 state 的原始对象!
// ❌ 非法 - 默认情况下,这将更改 state!
state.value = 123
:::
不能在 Redux 中更改 state 有几个原因:
- 它会导致 bug,例如视图未正确更新以显示最新值
- 更难理解状态更新的原因和方式
- 编写测试变得更加困难
- 它打破了正确使用“时间旅行调试”的能力
- 它违背了 Redux 的预期精神和使用模式
所以如果我们不能更改原件,我们如何返回更新的状态呢?
tip
Reducer 中必需要先创建原始值的副本,然后可以改变副本。
// ✅ 这样操作是安全的,因为创建了副本
return {
  ...state,
  value: 123
}
我们已经看到我们可以手动编写 immutable 更新,通过使用 JavaScript 的数组/对象扩展运算符和其他返回原始值副本的函数。但是,如果你认为“以这种方式手动编写 immutable 更新看起来很难记住和正确执行”……是的,你是对的!:)
手动编写不可变的更新逻辑确实繁琐,而且在 reducer 中意外改变状态是 Redux 用户最常犯的一个错误。
这就是为什么 Redux Toolkit 的 createSlice 函数可以让你以更简单的方式编写不可变更新!
createSlice 内部使用了一个名为 Immer 的库。 Immer 使用一种称为 “Proxy” 的特殊 JS 工具来包装你提供的数据,当你尝试 ”mutate“ 这些数据的时候,奇迹发生了,Immer 会跟踪你尝试进行的所有更改,然后使用该更改列表返回一个安全的、不可变的更新值,就好像你手动编写了所有不可变的更新逻辑一样。
所以,下面的代码:
function handwrittenReducer(state, action) {
  return {
    ...state,
    first: {
      ...state.first,
      second: {
        ...state.first.second,
        [action.someId]: {
          ...state.first.second[action.someId],
          fourth: action.someValue
        }
      }
    }
  }
}
可以变成这样:
function reducerWithImmer(state, action) {
  state.first.second[action.someId].fourth = action.someValue
}
变得非常易读!
但,还有一些非常重要的规则要记住:
警告
你只能在 Redux Toolkit 的 createSlice 和 createReducer 中编写 “mutation” 逻辑,因为它们在内部使用 Immer!如果你在没有 Immer 的 reducer 中编写 mutation 逻辑,它将改变状态并导致错误!
考虑到这一点,让我们回过头来看看计数器 slice 中的实际的 reducer。
export const counterSlice = createSlice({
  name: 'counter',
  initialState: {
    value: 0
  },
  reducers: {
    increment: state => {
      // Redux Toolkit 允许我们在 reducers 写 "可变" 逻辑。
      // 并不是真正的改变 state 因为它使用了 immer 库
      // 当 immer 检测到 "draft state" 改变时,会基于这些改变去创建一个新的
      // 不可变的 state
      state.value += 1
    },
    decrement: state => {
      state.value -= 1
    },
    incrementByAmount: (state, action) => {
      state.value += action.payload
    }
  }
})
我们可以看到 increment reducer 总是给 state.value 加 1。 因为 Immer 知道我们已经对原来的 state 对象进行了更改,所以我们实际上不必在此处返回任何内容。 同理,decrement reducer 减 1。
在这两个 reducer 中,我们实际上不需要让我们的代码查看 action 对象。它无论如何都会被传入,但由于我们不需要它,我们可以省掉把 action 声明为 reducer 的参数。
另一方面,incrementByAmount 这个 reducer 还需要知道更多信息:它应该增加多少计数器值。因此,我们将 reducer 声明为同时具有 state 和 action 参数。这样,我们知道我们在文本框中输入的金额被放入 action.payload 字段,这就是要被添加到 state.value 的值。
想了解更多?
关于不变性和编写 immutable 更新的更多信息,请参阅 “immutable 更新模式”文档页面 和 The Complete Guide to Immutability in React and Redux。
用 Thunk 编写异步逻辑
到目前为止,我们应用程序中的所有逻辑都是同步的。首先 dispatch action,store 调用 reducer 来计算新状态,然后 dispatch 函数完成并结束。但是,JavaScript 语言有很多编写异步代码的方法,我们的应用程序通常具有异步逻辑,比如从 API 请求数据之类的事情。我们需要一个地方在我们的 Redux 应用程序中放置异步逻辑。
thunk 是一种特定类型的 Redux 函数,可以包含异步逻辑。Thunk 是使用两个函数编写的:
- 一个内部 thunk 函数,它以
dispatch和getState作为参数 - 外部创建者函数,它创建并返回 thunk 函数
从 counterSlice 导出的函数就是一个 thunk action creator 的例子。
// 下面这个函数就是一个 thunk ,它使我们可以执行异步逻辑
// 你可以 dispatched 异步 action `dispatch(incrementAsync(10))` 就像一个常规的 action
// 调用 thunk 时接受 `dispatch` 函数作为第一个参数
// 当异步代码执行完毕时,可以 dispatched actions
export const incrementAsync = amount => dispatch => {
  setTimeout(() => {
    dispatch(incrementByAmount(amount))
  }, 1000)
}
我们可以像使用普通 Redux action creator 一样使用它们:
store.dispatch(incrementAsync(5))
但是,使用 thunk 需要在创建时将 redux-thunk middleware(一种 Redux 插件)添加到 Redux store 中。幸运的是,Redux Toolkit 的 configureStore 函数已经自动为我们配置好了,所以我们可以继续在这里使用 thunk。
当你需要进行 AJAX 调用以从服务器获取数据时,你可以将该调用放入 thunk 中。这是一个写得有点长的例子,所以你可以看到它是如何定义的:
// 外部的 thunk creator 函数
const fetchUserById = userId => {
  // 内部的 thunk 函数
  return async (dispatch, getState) => {
    try {
      // thunk 内发起异步数据请求
      const user = await userAPI.fetchById(userId)
      // 但数据响应完成后 dispatch 一个 action
      dispatch(userLoaded(user))
    } catch (err) {
      // 如果过程出错,在这里处理
    }
  }
}
在 第五节:异步逻辑和数据请求 中也使用到了 thunk。
细节说明:Thunk 和异步逻辑
我们知道我们不允许在 reducer 中放置任何类型的异步逻辑。但是,这种逻辑必须存在于某个地方。
如果我们可以访问 Redux 的 store,我们可以编写一些异步代码并在完成后调用 store.dispatch():
const store = configureStore({ reducer: counterReducer })

setTimeout(() => {
  store.dispatch(increment())
}, 250)
但是,在真正的 Redux 应用程序中,我们不允许将 store 导入到其他文件中,尤其是在我们的 React 组件中,因为它使代码更难以测试和重用。
另外,我们经常需要编写一些我们知道最终会与一些 store 一起使用的异步逻辑,但我们不知道是哪块 store。
Redux 的 store 可以使用 “middleware” 进行扩展,中间件是一种可以添加额外功能的附加组件或插件。使用中间件的最常见原因是让你编写具有异步逻辑的代码,但同时仍能与 store 对话。他们还可以修改 store,以便我们可以调用 dispatch() 并传入普通 action 对象以外的值,例如函数或 Promise。
Redux Thunk 中间件修改了 store 以让你将函数传递给 dispatch。事实上,代码很短,只有下面几行:
const thunkMiddleware =
  ({ dispatch, getState }) =>
  next =>
  action => {
    if (typeof action === 'function') {
      return action(dispatch, getState)
    }

    return next(action)
  }
它先判断传入 dispatch 的 action 是函数还是对象。如果是一个函数,则调用函数,并返回结果。否则,传入的是普通 action 对象,就把这个 action 传递给 store 处理。
这就让我们可以用一种方法来处理同步或者异步方法,同时仍然可以调用 dispatch 和 getState。
此文件中还有一个函数,我们稍后会在查看 <Counter>视图组件时讨论它。
想了解更多?
查看 the Redux Thunk docs, the post What the heck is a thunk? 以及 Redux FAQ entry on "why do we use middleware for async?" 获取更多信息。
React Counter 组件
前面,我们看到了一个独立的 React <Counter> 组件是什么样的。我们的 React+Redux 应用程序有一个类似的 <Counter> 组件,但它做了一些不同的事情。
我们将首先查看 Counter.js 组件文件:
import React, { useState } from 'react'
import { useSelector, useDispatch } from 'react-redux'
import {
  decrement,
  increment,
  incrementByAmount,
  incrementAsync,
  selectCount
} from './counterSlice'
import styles from './Counter.module.css'

export function Counter() {
  const count = useSelector(selectCount)
  const dispatch = useDispatch()
  const [incrementAmount, setIncrementAmount] = useState('2')

  return (
    <div>
      <div className={styles.row}>
        <button
          className={styles.button}
          aria-label="Increment value"
          onClick={() => dispatch(increment())}
        >
          +
        </button>
        <span className={styles.value}>{count}</span>
        <button
          className={styles.button}
          aria-label="Decrement value"
          onClick={() => dispatch(decrement())}
        >
          -
        </button>
      </div>
      {/* 这里省略了额外的 render 代码 */}
    </div>
  )
}
与之前的简单 React 示例一样,我们有一个名为 Counter 的函数组件,它将一些数据存储在 useState hooks 中。
然而,在我们的组件中,看起来我们并没有将当前计数器的值存储为 state。而是放到 count 变量中,但它不是来自 useState hooks。
虽然 React 包含几个内置 hooks,如 useState 和 useEffect,其他库可以创建自己的 自定义 hooks,使用 React 的 hooks 来构建自定义逻辑。
React-Redux 库 有 [一组自定义 hooks,允许你的 React 组件与 Redux store 交互](https://react-redux.js.org/api/hooks)。
使用 useSelector 提取数据
首先,useSelector 这个 hooks 让我们的组件从 Redux 的 store 状态树中提取它需要的任何数据。
前面讲过,我们可以编写 “selector” 函数,它以 state 作为参数并返回状态树的一部分。
counterSlice.js 在底部有这个 selector 函数:
// selector 函数允许我们从 state 中获取值
// Selectors 也可以在使用的地方内联的方式定义
// 而不是仅仅只能在 slice 文件中。例如 : `useSelector((state) => state.counter.value)`
export const selectCount = state => state.counter.value
如果我们可以访问 Redux 的 store,我们可以将当前计数器值检索为:
const count = selectCount(store.getState())
console.log(count)
// 0
我们的组件不能直接与 Redux store 对话,因为组件文件中不能引入 store。但是,useSelector 负责为我们在幕后与 Redux store 对话。 如果我们传入一个 selector 函数,它会为我们调用 someSelector(store.getState()),并返回结果。
因此,我们可以通过执行以下操作来获取 store 中的计数器值:
const count = useSelector(selectCount)
我们也不是只能使用已经导出的 selector。例如,我们可以编写一个选择器函数作为 useSelector 的内联参数:
const countPlusTwo = useSelector(state => state.counter.value + 2)
每当一个 action 被 dispatch 并且 Redux store 被更新时,useSelector 将重新运行我们的选择器函数。如果选择器返回的值与上次不同,useSelector 将确保我们的组件使用新值重新渲染。
使用 useDispatch 来 dispatch action
类似地,我们知道如果我们可以访问 Redux store,我们可以使用 action creator 来 dispatch action,比如 store.dispatch(increment())。 由于我们无法访问 store 本身,因此我们需要某种方式来访问 dispatch 方法。
useDispatch hooks 为我们完成了这项工作,并从 Redux store 中为我们提供了实际的 dispatch 方法:
const dispatch = useDispatch()
从那里,我们可以在用户执行诸如单击按钮之类的操作时 dispatch 对应 action:
<button
  className={styles.button}
  aria-label="Increment value"
  onClick={() => dispatch(increment())}
>
  +
</button>
组件 State 与 表单
现在你可能想知道,“我是否总是需要将我所有应用程序的状态放入 Redux store?”
答案是 不。整个应用程序所需的全局状态应该放在 Redux store 中。而只在一个地方用到的状态应该放到组件的 state。
在这个例子中,我们有一个文本输入框 input,用户可以在其中输入要添加到计数器的下一个数字:
const [incrementAmount, setIncrementAmount] = useState('2')

// later
return (
  <div className={styles.row}>
    <input
      className={styles.textbox}
      aria-label="Set increment amount"
      value={incrementAmount}
      onChange={e => setIncrementAmount(e.target.value)}
    />
    <button
      className={styles.button}
      onClick={() => dispatch(incrementByAmount(Number(incrementAmount) || 0))}
    >
      Add Amount
    </button>
    <button
      className={styles.asyncButton}
      onClick={() => dispatch(incrementAsync(Number(incrementAmount) || 0))}
    >
      Add Async
    </button>
  </div>
)
我们可以在 Redux store 中保留当前数字字符串,方法是在输入的 onChange 处理程序中 dispatch action 并将其保存在我们的 reducer 中。但是,这并没有给我们带来任何好处。唯一使用文本字符串的地方是这里,在 <Counter> 组件中。(当然,在这个例子中只有一个其他组件:<App>。但即使我们有一个包含许多组件的更大的应用程序,也只有 <Counter> 关心这个输入值。)
因此,将该值保留在 <Counter> 组件中的 useState 的 hooks 中是有意义的。
类似地,如果我们有一个名为 isDropdownOpen 的布尔值,应用程序中的其他组件不会关心它——它应该真正保持在这个组件的本地。
在 React + Redux 应用中,你的全局状态应该放在 Redux store 中,你的本地状态应该保留在 React 组件中。
如果你不确定该放在哪里,这里有一些常用的经验法则,用于确定应该将哪种数据放入 Redux:
- 应用程序的其他部分是否关心这些数据?
- 你是否需要能够基于这些原始数据创建进一步的派生数据?
- 是否使用相同的数据来驱动多个组件?
- 能够将这种状态恢复到给定的时间点(即时间旅行调试)对你是否有价值?
- 是否要缓存数据(即,如果数据已经存在,则使用它的状态而不是重新请求它)?
- 你是否希望在热重载视图组件(交换时可能会丢失其内部状态)时保持此数据一致?
这也是一般如何在 Redux 中考虑表单的一个很好的例子。 大多数表单的 state 不应该保存在 Redux 中。 相反,在编辑表单的时候把数据存到表单组件中,当用户提交表单的时候再 dispatch action 来更新 store。
在我们继续之前要注意的另一件事是:还记得 counterSlice.js 中的 incrementAsync 这个 thunk 吗?我们在这个组件中使用它。请注意,我们使用它的方式与 dispatch 其他普通的 action 是一样的。这个组件不关心我们是在 dispatch 一个普通的 action 还是异步逻辑。它只知道当你点击那个按钮时,它会执行 dispatch。
Providing the Store
我们已经看到我们的组件可以使用 useSelector 和 useDispatch 这两个 hooks 与 Redux 的 store 通信。奇怪的是,我们并没有导入 store,那么这些 hooks 怎么知道要与哪个 Redux store 对话呢?
现在我们已经看到了这个应用程序的全貌,是时候回到这个应用程序的起点,看看拼图的最后部分是如何组合在一起的。
import React from 'react'
import ReactDOM from 'react-dom'
import './index.css'
import App from './App'
import store from './app/store'
import { Provider } from 'react-redux'
import * as serviceWorker from './serviceWorker'

ReactDOM.render(
  <Provider store={store}>
    <App />
  </Provider>,
  document.getElementById('root')
)
我们总是必须调用 ReactDOM.render(<App />) 来告诉 React 开始渲染我们的根 <App> 组件。 为了让像 useSelector 这样的 hooks 正常工作,我们需要使用一个名为 <Provider> 的组件在幕后传递 Redux store,以便他们可以访问它。
我们在这里引用来自 app/store.js 中创建的 store。然后,用 <Provider> 包裹整个 <App>,并传入 store:<Provider store={store}>。
现在,任何调用 useSelector 或 useDispatch 的 React 组件都可以访问 <Provider> 中的 store。
你学到了
尽管 Count 这个应用程序非常小,但它展示了 React + Redux 应用程序协同工作的所有关键部分。 以下是我们介绍的内容:
总结
- 我们可以使用 Redux Toolkit
configureStoreAPI 创建一个 Redux storeconfigureStore接收reducer函数来作为命名参数configureStore自动使用默认值来配置 store
- 在 slice 文件中编写 Redux 逻辑
- 一个 slice 包含一个特定功能或部分的 state 相关的 reducer 逻辑和 action
- Redux Toolkit 的
createSliceAPI 为你提供的每个 reducer 函数生成 action creator 和 action 类型
- Redux reducer 必须遵循以下原则
- 必须依赖
state和action参数去计算出一个新 state - 必须通过拷贝旧 state 的方式去做 不可变更新 (immutable updates)
- 不能包含任何异步逻辑或其他副作用
- Redux Toolkit 的
createSliceAPI 内部使用了 Immer 库才达到表面上直接修改("mutating")state 也实现不可变更新(immutable updates)的效果
- 必须依赖
- 一般使用 “thunks” 来开发特定的异步逻辑
- Thunks 接收
dispatch和getState作为参数 - Redux Toolkit 内置并默认启用了
redux-thunk中间件
- Thunks 接收
- 使用 React-Redux 来做 React 组件和 Redux store 的通信
- 在应用程序根组件包裹
<Provider store={store}>使得所有组件都能访问到 store - 全局状态应该维护在 Redux store 内,局部状态应该维护在局部 React 组件内
- 在应用程序根组件包裹
下一步
现在你已经看到了 Redux 应用程序的所有部分,是时候编写自己的应用程序了! 在本教程的其余部分,你将构建一个更大的使用 Redux 的示例应用程序。 在此过程中,我们将介绍正确使用 Redux 所需了解的所有关键思想。
继续阅读 第 3 部分:Redux 数据流基础 以开始构建示例应用程序。